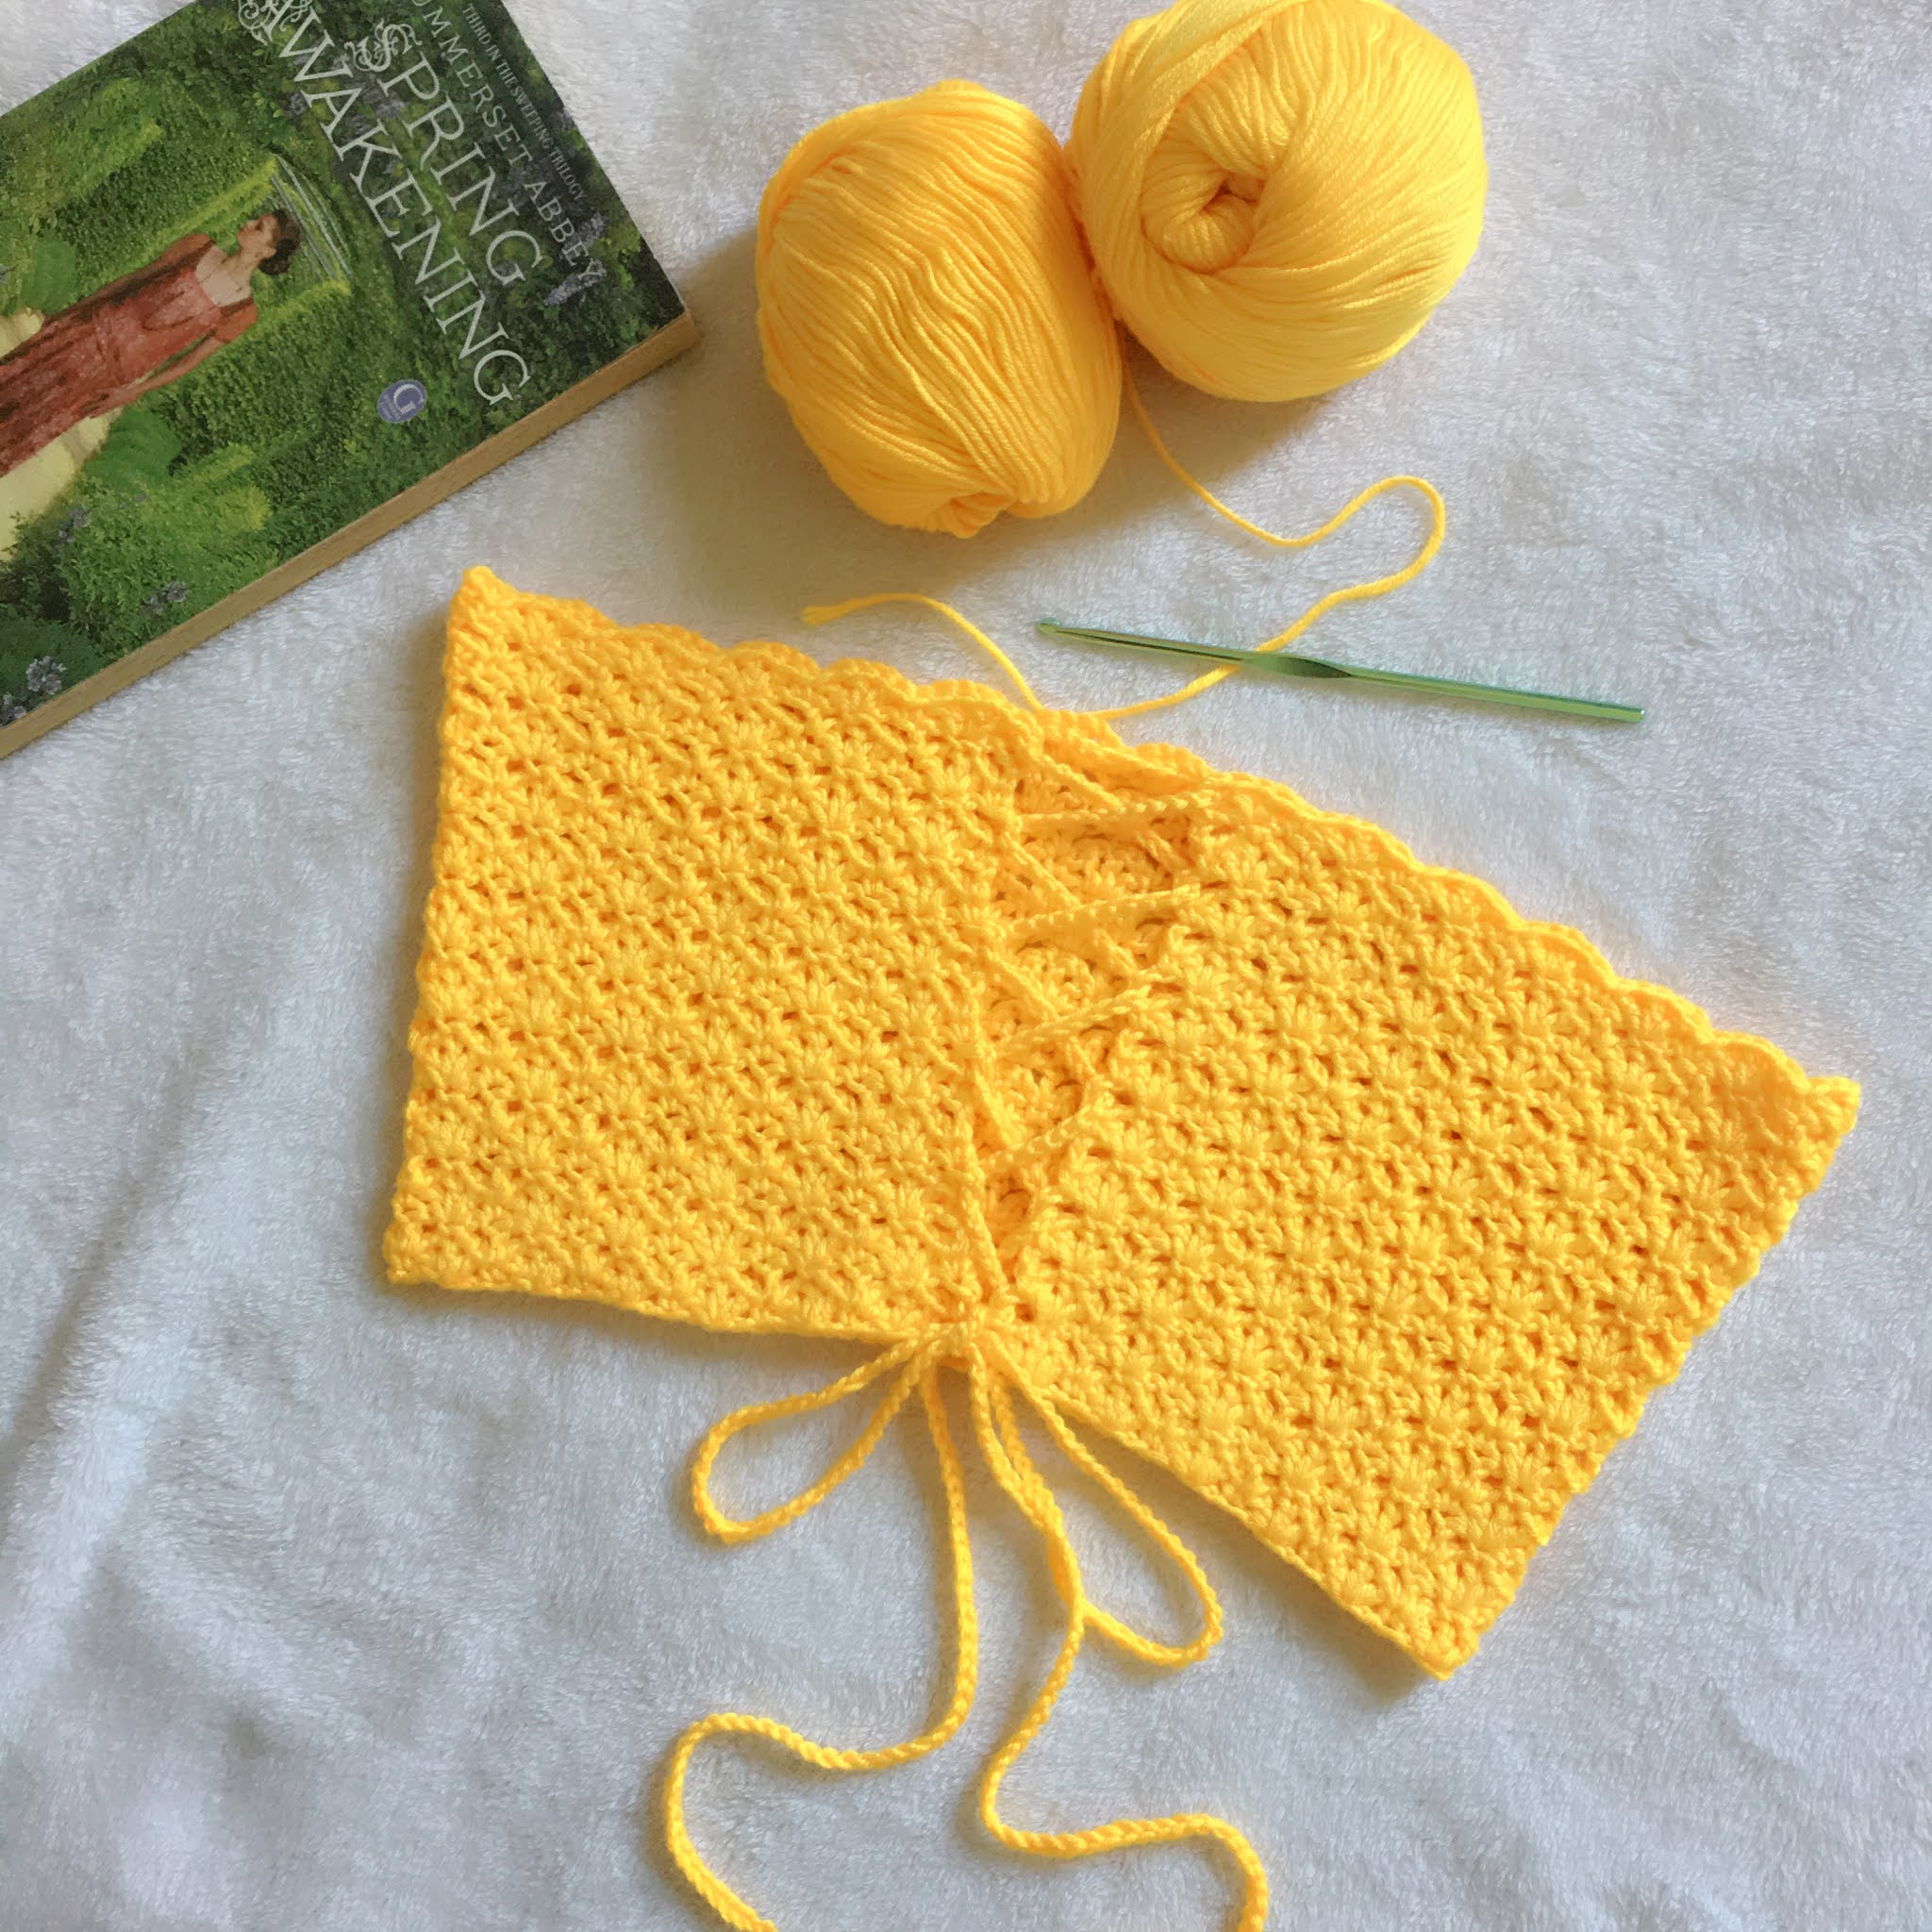
You can buy the ads-free PDF version of this pattern here.
Size:
(S,
M, L, XL, 2XL, 3XL)
Materials:
Scissor
Yarn :
Sport/DK
Weight
Approximately
(70, 90, 110, 130, 150, 170) grams
Hook:
4.0
mm or any size needed to obtain gauge
Gauge:
3
rows of 2 shells pattern (Width x Height) = 2” x 2.25” inches
Lacy shell pattern:
Sc,
skip next st, (dc, ch 1, dc, ch 1, dc) in next st, skip next st, sc
Stitches:
Chain
– ch
Single
crochet - sc
Double
crochet - dc
Abbreviation:
Stitch
– st
Space - sp
Right
side- RS
Wrong
side- WS
You can refer to the video tutorial on my YouTube channel.
Instructions:
Direction in parentheses are for (S,
M, L, XL, 2XL, 3XL)
Foundation chain:
Make
a slip knot and ch (106, 110, 114, 118, 122, 126).
Row 1(RS):
Sc
in the second ch from hook, *skip next ch, (dc, ch 1, dc, ch 1, dc) in next ch,
skip next ch, sc in next ch*, repeat *to* till end of ch, ch 4, turn.
Ch
4 will be counted as dc and ch 1 for the next row.
Total
(26, 27, 28, 29, 30, 31) shells.
Row 2(WS):
Skip
the first 2 sts and ch 1- sp,* sc in nxt st, ch 1, skip ch 1- sp and nxt st, dc
in nxt st, ch 1, skip nxt st and ch 1- sp*, repeat * to* till end of row, ch 1,
turn.
Row 3:
Sc
in the very first st, *skip next ch 1- sp, (dc, ch 1, dc, ch 1, dc) in next st,
skip next ch 1 - sp, sc in next st*, repeat *to* across until the first ch 4 remaining,
skip 1 ch , sc in next ch, ch 4, turn.
Row 4 – (21, 23, 25, 27, 29, 31):
Repeat
Row 2 – 3 alternately.
If
you want your top to be longer, simply add more rows.
For
the tie make a long chain, ch 300 or more and insert it in zig zag manner to
connect the top.
And
you’re done 😊
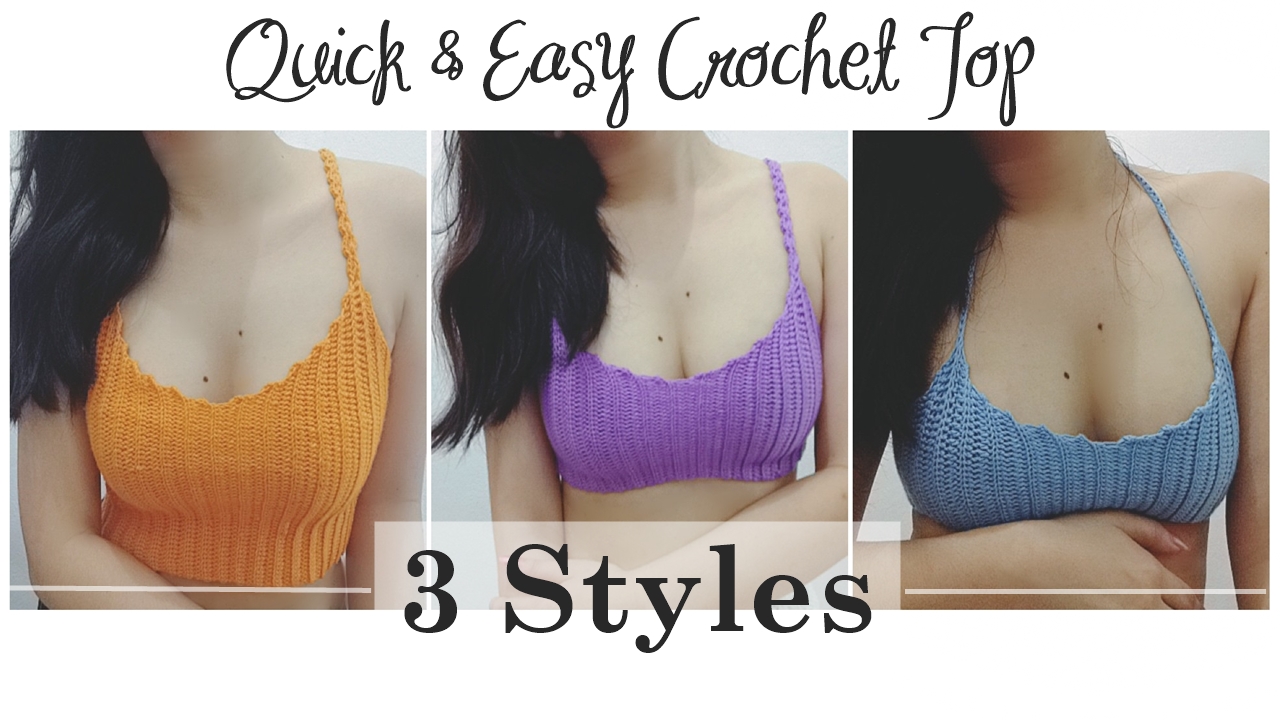
Hello fellow unraveler, sorry to keep you guys waiting but as promised the video tutorial for this top is now up on my YouTube channel.
Have you tried to make the bikini bottom?
If yes then you won't have much problem making this top because the pattern is pretty much the same you only need to know how to do the increase and decrease.
This pattern actually is quite similar to the Quick & Easy Crochet Top, but instead of making the strap without breaking off the yarn, I made the strap separately after I've finished making the body.
I wanted to make this pattern as simple and easy as possible especially for beginners, but if you want to make the strap continuously without having to rejoin the yarn after you've finished the body, just follow the strap pattern from Quick & Easy Crochet Top.
You can buy the ads-free clean printable PDF version of this pattern here.
If
you don’t understand any part of this pattern, please refer to the video tutorial.
Level:
Advanced
Beginner
Size: Bust (inch)
XS = 31"-32" S = 33"-34" M = 35"-36" L = 37"-38" XL = 39"-40" XXL = 41"-42"
Repeat
the pattern on previous 2 rows alternately, decreasing 1 stitch on each row.
Total (10, 10, 12, 12, 14, 14) rows of
decrease, 12 sc, (12, 12, 14, 14, 16, 16) hdc on lst row. Ch 1, leave a long
tail for sewing.
Facing
WS, sew side seam. Fasten off, weave in ends.
Now
let’s continue to make the straps.
Right
strap:
Facing WS, join yarn with a knot in
the front right side of the row before the first row of decrease, ch 2, sc in
the nxt 3 hdc-sp, ch 1, turn.
Row
1-(46, 46, 48, 48, 50, 50):
Sc in nxt 3 sts, ch 1,
turn.
Attach strap at the back, join in 13th
row after the lst row of decrease,
ch 1, *insert hook in same row and in
first st of strap, sl st to join*.
Repeat * to * in the nxt 2 rows and 2
sts of strap, ch 2. Fasten off. Weave in ends.
Left
strap:
Facing WS, join yarn with a knot in
the front left side on the 3rd row after the last row of increase,
ch 2, sc in the nxt 3 hdc-sp, ch 1, turn.
Row
1-(46, 46, 48, 48, 50, 50):
Sc in nxt 3 sts, ch 1,
turn.
Attach strap at the back, join in the
11th row before the first row of increase, ch 1, *insert hook in
same row and in first st of strap, sl st to join*.
Repeat * to * in the nxt 2 rows and 2
sts of strap, ch 2. Fasten off, weave in ends.
Simply
make more rows for longer strap or eliminate a few rows to make it shorter. For
wider straps, make more than 3 sc.
Flip
right side out and you’re done!
~If
you don’t understand any part of this pattern, please refer to the video tutorial~
You can buy the ads-free clean printable PDF version of this pattern here.
Yarn: Blended sport
weight yarn. You can use any type of yarn you prefer. Approximately (50, 50, 60,
60)g.
Abbreviation: Wrong
side (WS), right side (RS), stitches (sts), space (sp), next (nxt).
Instructions:
Direction in parentheses are for (A/B,
B/C, C/D, D/DD).
Foundation chain:
Make
a slip knot and ch (17, 19, 21, 23).
Cup (make two)
Row 1(RS):
Dc
in 4th ch from hook, dc across until 1 ch remain, 7 dc in the last
ch, dc across on the other side. Turn.
Row 2(WS):
Ch
3, dc in each of the next (15, 17, 19, 21) sts, 2 dc in nxt st, 3 dc in nxt st,
2 dc in nxt st, dc in each of the nxt (16, 18, 20, 22) sts across. Turn.
Row 3:
Ch
3, dc in each of the sts across until you reach the 3 dc in the same st, 2 dc
in nxt st, 3 dc in nxt st, 2 dc in nxt st, dc in of the sts across. Turn.
Row 4 – (6, 8, 10, 12, 14):
Repeat
row 3.
Remember every time you reach the 3 dc
in the same st, make 2 dc in first st, 3
dc in nxt st, 2 dc in last st.
Row (7, 9, 11, 13, 15):
*Ch
6, skip nxt 2 sts, sl st in nxt st*, repeat *to* till the end of row. Ch 1,
fasten off.
Make another cup, but do not cut off
yarn when you have finished.
Continue
to make 2 sc in each of the dc-sp at the base of the cup, ch 7, join first cup
with sc in dc-sp, sc in the same dc-sp and continue to make 2 sc in each dc-sp
across.
Now continue to make the mesh on nxt
row.
Row (8, 10, 12, 14, 16):
*Ch
6, sl st in nxt 6-ch-sp*, repeat *to* till the last 6-ch-sp, ch 4, skip 3 ch,
sl st in nxt ch, ch 4, skip 3 ch, sl st in nxt 6-ch-sp, repeat *to* till the
end of row.
Continue at the base of both cups.
Ch
6, sc in each of the sts across, 3 sc in 3-ch-sp, sc in nxt st, 3 sc in nxt
3-ch-sp, sc in each of the sts across, 4 sc in 6-ch-sp.
Continue to make the mesh again.
Row (9, 11, 13, 15, 17):
*Ch
5, sl st in nxt 6-ch-sp,* repeat*to* till the last 6-ch-sp, ch 5, sl st in 4-ch-sp, ch 3, sl st in nxt 4-ch-sp,
repeat*to* across, 4 sc in last 6-ch-sp, sl in nxt st. Ch 1, fasten off. Weave
in ends.
For the removeable strings (make 4):
Ch
120, sl st in 5th ch from hook to create a small hole, sl st in each
sts across, ch 1, fasten off. Tie ends into a knot.
Now
insert the end of the string with the small hole in the center top/lower side
space of the cup. Insert and pull the other end of string into the small hole.
Repeat for each side.
String for the middle part:
Ch
100 or as long as you want, insert in a criss cross pattern in the middle of the
bikini.
And
you’re done.
Yippie :)
This top can be made with any kind of yarn and hook size you prefer. To get the perfect fit for your body, make as many rows you need to cover ¾ of your back and make sure it can stretch until it covers your whole back. The numbers of row must end in odd numbers.
Sorry my voice was groggy in this video because I recorded the audio at 2 am in the morning.
You can buy the ads-free clean printable PDF version of this pattern here.
~Please refer to the video tutorial if you can't understand any part of this pattern~
Size: Small (32-34)
Yarn: Cotton/Acrylic/Blended sport weight yarn. You can use any type of yarn you prefer. Approximately (130g, 60g, 40g).
Abbreviation: Wrong side (WS), right side (RS), back loop only (BLO), stitches (sts), space (sp), next (nxt), yarn over (yo).
Instructions:
Direction in parentheses are for (crop top, bralette, bikini top).
Foundation chain:
Make a slip knot and ch (52, 32, 25) or as long as you want your top to be.
Row 1(WS):
Hdc in 3rd chain from hook and across, ch 2, turn.
Row 2 - 30:
Hdc in the back loop only(BLO) of each stitches across, ch 2, turn.
Row 31:
Hdc in the BLO of each stitches across, ch 4, turn.
Now you have 31 rows of (50, 30, 23) hdc. Add more rows if your piece doesn’t cover your whole back when you stretch it, just make sure you end it with odd numbers.
Now we are going to increase the stitches.
Row 32:
Hdc in 3rd and 4th ch from hook, hdc in BLO across, ch 2, turn.
Row 33 - 41:
Repeat row 31 - 32 alternately.
After row 41 do not ch 4, continue to make the shoulder strap.
Watch the video on how to make and attach the strap.
If you want to make it into a halter top that can be tied around your neck:
Ch 100, sc in second ch from hook and across. Continue with row 42.
Shoulder strap:
Ch 3, 2 dc in hdc st, *ch 3, 2 dc in dc-space*, repeat *to* 17 times.
Shoulder strap will be the indicator that you are facing the right side(RS).
Attach strap at the back.
Count fom right to left from row 31, skip 9 rows, ch 3, insert hook in hdc-sp on row 10, yo, sl st, *yo, insert hook in dc-sp, yo, pull through two loops, insert hook in hdc-sp, yo, pull through two loops*, repeat * to *.
Turn your work and crochet back upward.
*Ch 3, dc in dc-sp, slip stitch in nxt dc-sp*, repeat * to * across.
After the last dc in dc-sp, join strap on row 42 with hdc instead of slip stitch.
Row 42:
Hdc in hdc st, hdc in BLO across, ch 2, turn.
Row 43 - 44:
Hdc in BLO across, ch 2, turn.
Now we are going to decrease the stitches.
Row 45:
Hdc in BLO across until 2 sts remain, ch 2, turn.
Row 46:
Hdc in BLO across, ch 2, turn.
Row 47 - 52:
Repeat row 45 - row 46 alternately.
Row 53:
Hdc in BLO across, ch 4, turn.
Row 54 - 74:
Repeat Row 32 – 52.
Facing the wrong side, join in BLO and foundation chain with slip stitch across until 2 sts remain.
Ch 2 Fasten off. Weave in ends.
And you’re done. Yippie :)
~If you don’t understand any part of this pattern please refer to the video tutorial~
In this tutorial I am making a bralette that can fit size S-M.
You can simply add more rows for bigger size.
Stitches used :
Ch, sl st, sc, dc, shell st(5 dc in same st/space).
You can use sport/light worsted or any type of yarn you prefer.
Gauge:
7 dc = 1.0 x 0.5 inch.
Use any hook size to obtain gauge.
You can buy the ads-free clean printable version of this pattern here.
Instructions:
Begin with a slip knot and ch 22.
Row 1:
Dc in 4th ch from hook and across, (4 dc, ch 2, 4 dc) in last ch, dc across. Turn.
Row 2:
Ch 3, dc across, (2 dc, ch 2, 2 dc) in 2-chain-space, dc across. Turn.
Row 3-7:
Repeat row 2 for the next 5 rows. Ch 1, cut off yarn.
Make the second cup but do not cut off yarn. Continue to connect the cups together.
Make 2 sc in each dc-spaces across, ch 5, 2 sc in each dc-spaces across.
Row 8:
Ch 3, 2 dc, *ch 2, skip 2 sts, 2 dc*. Repeat * to * across until you’ve reach the 2-ch-sp.
Now make (2 dc, ch 2, 2 dc) in the 2-ch-space, dc in nxt 2 sts, repeat * ch 2, skip 2 sts, 2 dc * across.
Dc in last 3 sts, ch 2, skip 2 ch, dc, ch 2, skip 2 ch, dc in the nxt 3 sts of the second cup.
Repeat the whole process like the previous cup.
Continue for the bottom part.
Skip dc-space, shell (5 dc in same st) in nxt sc st, #skip 2 st, sc in nxt st, skip 2 st, shell in nxt st#. Repeat # to # across.
Now we are going to make the strap.
Ch 2, dc in same st. Repeat (ch 2, dc in same st) 40 times. Turn back to the beginning of strap by sl st in the second st, ch 2, dc in same st.
Repeat (sl st in nxt st, ch 2, dc in same st) across. Sl st in nxt st.
Row 9:
Skip nxt st, shell in 2-ch-sp, skip nxt 2 sts, sc in nxt 2-ch-sp.
Repeat (skip nxt 2 sts, shell in 2-ch-sp, skip nxt 2 sts, sc in nxt 2-ch-sp) 3 times. Skip the nxt 2 sts, 3 dc in nxt st, skip nxt st, sl st in 2-ch-sp.
Continue making the strap like the previous steps.
Sl st in 2-ch-sp, skip nxt st, 3 dc in nxt st, skip nxt 2 sts, sc in 2-ch-sp.
Repeat (skip nxt 2 sts, shell in 2-ch-sp, skip nxt 2 sts, sc in nxt 2-ch-sp) 3 times. Skip nxt 2 sts, shell in nxt 2-ch-sp, skip nxt 2 sts, sc in nxt st.
Continue to the other cup.
Skip 2 ch, shell in nxt st, skip 2 ch. Repeat the whole process like the previous cup. Skip nxt st, sl st in nxt st. Continue making the strap like the previous steps.
Finally, sl st in nxt st, ch 2. Fasten off. Weave in ends.
And we’re done. Yippie :)
In this tutorial I am using acrylic yarn but you can use any type of yarn you like.
Hook size 3.0 mm/any hook size to obtain gauge. Make sure to check your gauge first 12 dc= 2.0 x 0.5 inch. Stitches used : ch, sl st, sc, hdc, dc.
In this tutorial cup size is approximately 5"x5" inch. (Size S, Cup A/B) XS, AA: Ch 11, 6 rows (4"x4") S, A/B: Ch 14, 7 rows (5"x5") M, B: Ch 17, 8 rows (6"x6") L, C: Ch 20, 9 rows (7"x7") XL, D: Ch 23, 10 rows (8"x8") XXL, DD: Ch 26, 11 rows (9"x9")
You can buy the ads-free clean printable PDF version of this pattern here.
~If you can't understand any part of the pattern, please refer to the video tutorial~ Simple Crochet Bikini Top (Size S, Cup A/B) Instructions: Begin with a slip knot and ch 14. Row 1: Dc in 4th ch from hook, dc across, 7 dc in the last ch, continue to dc on the other side across. Turn. Row 2: Ch 3, dc in each of the nxt 12 sts,* 2 dc in nxt st, 3dc in nxt st, 2dc in nxt st*, dc in each of the nxt 13 sts. Turn. Row 3: Ch 3, dc in each if the nxt 14 sts, repeat *to *, dc in each of the nxt 15 sts. Row 4-7: Repeat previous steps. Ch 1, fasten off and make another cup. Do not cut off yarn for the second cup, continue at the bottom of the cup. Ch 1, make 2 sc in each of the dc space across, ch 5, connect with 2 sc in the other cup dc space, 2 sc in each of the dc space across, 3 sc in the last dc space. Continue to make the string. Ch 100, sc in 2nd ch from hook, sc across, sl st in dc space. Now we are going to make the edging. Ch 3, dc in the same dc space, *skip nxt st, sc in nxt st, ch 2, dc in same st*. Repeat *to* 10 times until you reach the 3 dc in the same st, sc in nxt st. Continue to make the string. Ch 100, sc in 2nd ch from hook, sc across, sl st in dc space. Continue with the edging. Sl st in nxt st, sc in nxt st, ch 2, dc in same st, repeat *to* 11 times, hdc in each of the nxt 5 sts across, sl st in dc space, ch 3, dc in the same dc space. Repeat the steps like the previous cup to make the edging and string. Finally, sl st in the first sc, ch 1, fasten off. Weave in ends. And we’re done. Yippie :)
This is my first YouTube video tutorial and I will be making more video soon. Have fun crocheting and thank you for your support:)