The Happy Unraveler


~If you don’t understand any part of this pattern please refer to the video tutorial~

In this tutorial I am making a bralette that can fit size S-M. 
You can simply add more rows for bigger size.

Stitches used : 
Ch, sl st, sc, dc, shell st(5 dc in same st/space).

Materials:
3.0mm crochet hook, yarn (approx. 50g), scissor, measuring tape. 

You can use sport/light worsted or any type of yarn you prefer.

Gauge:
 7 dc = 1.0 x 0.5 inch. 
Use any hook size to obtain gauge.


You can buy the ads-free clean printable version of this pattern here.


Instructions:

Begin with a slip knot and ch 22.

Row 1:  
Dc in 4th ch from hook and across, (4 dc, ch 2, 4 dc) in last ch, dc across. Turn.

Row 2:
  Ch 3, dc across, (2 dc, ch 2, 2 dc) in 2-chain-space, dc across. Turn.

Row 3-7:
 Repeat row 2 for the next 5 rows. Ch 1, cut off yarn. 

Make the second cup but do not cut off yarn. Continue to connect the cups together.

Make 2 sc in each dc-spaces across, ch 5, 2 sc in each dc-spaces across.

Row 8: 
 Ch 3, 2 dc, *ch 2, skip 2 sts, 2 dc*. Repeat * to * across until you’ve reach the 2-ch-sp. 

Now make (2 dc, ch 2, 2 dc) in the 2-ch-space, dc in nxt 2 sts, repeat * ch 2, skip 2 sts, 2 dc  * across. 

Dc in last 3 sts, ch 2, skip 2 ch, dc, ch 2, skip 2 ch, dc in the nxt 3 sts of the second cup. 
Repeat the whole process like the previous cup.

Continue for the bottom part.
Skip dc-space, shell (5 dc in same st) in nxt sc st, #skip 2 st, sc in nxt st, skip 2 st, shell in nxt st#. Repeat # to # across.

Now we are going to make the strap.
Ch 2, dc in same st. Repeat (ch 2, dc in same st) 40 times. Turn back to the beginning of strap by sl st in the second st, ch 2, dc in same st. 
Repeat (sl st in nxt st, ch 2, dc in same st) across. Sl st in nxt st.  

Row 9: 
Skip nxt st, shell in 2-ch-sp, skip nxt 2 sts, sc in nxt 2-ch-sp. 
Repeat (skip nxt 2 sts, shell in 2-ch-sp, skip nxt 2 sts, sc in nxt 2-ch-sp) 3 times. Skip the nxt 2 sts, 3 dc in nxt st, skip nxt st, sl st in 2-ch-sp.

Continue making the strap like the previous steps. 
Sl st in 2-ch-sp, skip nxt st, 3 dc in nxt st, skip nxt 2 sts, sc in 2-ch-sp. 
Repeat (skip nxt 2 sts, shell in 2-ch-sp, skip nxt 2 sts, sc in nxt 2-ch-sp) 3 times. Skip nxt 2 sts, shell in nxt 2-ch-sp, skip nxt 2 sts, sc in nxt st.

Continue to the other cup. 
Skip 2 ch, shell in nxt st, skip 2 ch. Repeat the whole process like the previous cup. Skip nxt st, sl st in nxt st. Continue making the strap like the previous steps.

Finally, sl st in nxt st, ch 2. Fasten off. Weave in ends.

And we’re done. Yippie :)


In this tutorial I am using acrylic yarn but you can use any type of yarn you like.

Stitches used : ch, sl st, sc, dc.
Hook size 3.0 mm/any hook size to obtain gauge.
Make sure to check your gauge first 7 dc= 1.0 x 0.5 inch.

Cup size is approximately 5.5x5.5 inch. 

~Please refer to the video tutorial if you can’t understand any part of this pattern~


You can buy the ads-free clean printable PDF version of this pattern here.


Instructions:

(Make two cups)

Begin with a slip knot and chain 17.

Row 1: 
Dc in 4th ch from hook, dc across, (3dc, ch 2, 3dc) in last ch, dc on the other side across. Turn.

Row 2:
 *Ch 3, dc across, (2 dc, ch 2, 2 dc) in 2-ch-space, dc across*. Turn.

Row 3-8: 
Repeat * to * 6 more times. Turn. (Total 8 rows). 
Add more rows for bigger size.

Continue to make the edging.
 #Skip 1 st, (sc, ch 2, sc) in nxt st#. Repeat # to # across until you reach the 2-ch-space.

Continue to make the string.
Skip 1 st, sl st in 2-ch-sp, ch 100, sc in 2nd ch from hook and across. Sl st in 2-ch-sp.

Continue to make the edging.
Repeat # to # across. Skip nxt st.  

Continue at the bottom part of the cup.
2 sc in each dc spaces across. Ch 1, fasten off. Weave in ends.

Repeat the whole process and make another one.

Now continue to make the drawstring.
Ch 250, sc in 2nd ch from hook and across. Ch1, fasten off. Weave in ends.

Finally insert the string in dc spaces at the bottom part of both cups.

And we’re done. 
Yippie :) 
Time to go to the beach!

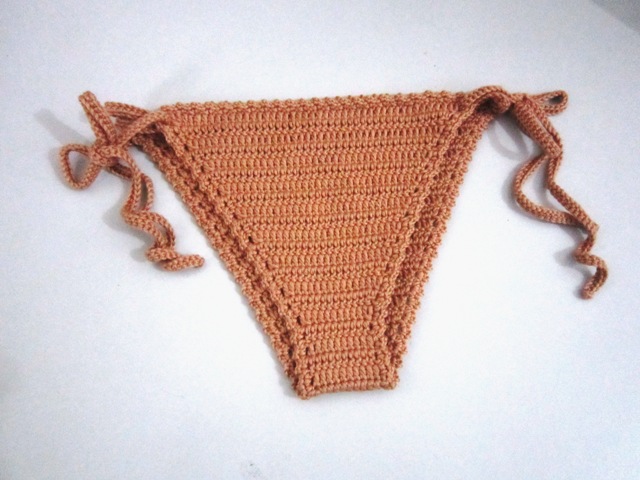
Matching bikini bottom.


You can simply adjust this pattern by measuring your own panties and follow the steps: rows of decrease each side, rows of even dc, rows of increase each side.

~If you don’t understand any part of this pattern, please refer to the video tutorial~


You can buy the ads-free clean printable PDF version of this pattern here.


Size: 
(XS/S, S/M, M/L, L/XL)

Yarn: 
Cotton/Acrylic/Blended fine baby/sport weight yarn. You can use any type of yarn you prefer. Approximately (50, 60, 70, 80)gram.

Hook: 
3.0 mm or any size needed to obtain gauge.

Gauge: 
A row of 7 dc  = 1.0” x 0.5” inch

Stitches used: 
Chain stitch (ch), slip stitch (sl st), single crochet (sc), double crochet (dc).

Abbreviation: 
Wrong side (WS), right side (RS), stitches (sts), space (sp), next (nxt), 2 double crochet together decrease/increase (2dctog, dec/inc).

Instructions:
First ch 3 counts as first dc.
Direction in parentheses are for (XS/S, S/M, M/L, L/XL).

Foundation chain: 
Make a slip knot and ch (48, 52, 56, 60).

Row 1(RS): 
2dctog (dec) in the 4th and 5th ch from hook, (40, 44, 48, 52) dc across, 2dctog (dec) in the nxt 2 sts, dc in last st, turn.

Row 2(WS) - (17, 18, 20, 21): 
Ch 3, 2dctog (dec) in nxt 2 sts, dc across in each sts across until 3 sts remain, 2dctog (dec) in nxt 2 sts, dc in last st, turn.

Now you have a total of (17, 18, 20, 21) rows of dec.

Stop decreasing the sts on each side and continue with even number of dc on nxt (5, 7, 7, 9) rows.

Row (18, 19, 21, 22) – (22, 25, 29, 32): 
Ch 3, dc in each sts across, turn. Total (12, 14, 14, 16) dc.

Continue to expand your work for the back part by adding 1 dc on each side.

Row (23, 26, 30, 33): 
Ch 3, 2 dc in nxt st, dc in each sts across until 2 sts remain, 2 dc in nxt st, dc in last st, turn.

Row (24, 27, 31, 34) - (45, 53, 59, 65): 
Repeat previous row.

 Now you have a total of (23, 28, 32, 35) rows of inc.

After the last row, do not cut off yarn.

Continue to make the 1st string.
Ch (100, 110, 120, 130), sc in 2nd ch from hook and across.

Continue with the edging.
*(Sc, ch 2, sc) in dc-space*, repeat *to* across.

Continue to make the 2nd string.
Ch (100, 110, 120, 130), sc in 2nd ch from hook and across.

Continue with the edging.
#Skip nxt st, (sc, ch 2, sc) in nxt st#. Repeat #to# across.

Continue with the 3rd string.
Ch (100, 110, 120, 130), sc in 2nd ch from hook and across.

Continue with the edging.
*(Sc, ch 2, sc) in dc-space*, repeat *to* across.

Continue to make the last string.
Ch (100, 110, 120, 130), sc in 2nd ch from hook and across.

Continue with the edging.
#Skip 1 st, (sc, ch 2, sc) in nxt st#. Repeat #to# across.

Finally, sl st in nxt st, ch 1. Fasten off. Weave in ends.
Insert the string in dc-space.


And you’re done. Yippie J


This pattern is easy to follow and you can adjust the size by adding more cross stitch and increase the rows. You can make a larger cowl by using bulky yarn and a bigger hook size.


You can download the ads-free clean printable PDF version of this pattern here. 


Hook: 
6.5mm crochet hook

Yarn: 
Cotton yarn (approx. 100g)

Check your gauge 7 dc = 2.0 x 1.0 inch. Use any hook size to obtain gauge.

Stitches used:
 chain (ch), slip stitch (sl st), double crochet (dc)

Cross stitch (CS):
 Skip nxt 2 sts, dc in nxt st, ch 1, dc backward in first st of skipped 2 sts

~Please refer to the video tutorial if you can’t understand any part of the pattern~

Instructions:

Begin with a slip knot and chain 27.

Row 1:
 Dc in 4th ch from hook, *Skip nxt 2 sts, dc in nxt st, ch 1, dc backward in first st of skipped 2 sts* = 1 cross stitch (CS), repeat * to * 6 times. Dc in the nxt 2 sts. Turn (Total 7 CS).

Row 2: 
Ch 3, dc, 7 CS, dc in nxt 2 sts. Turn.

Row 3- 35: 
Repeat Row 2.

Now we are going to join two sides of the cowl together.
Fold your cowl (facing the wrong side), join with a slip stitch.

Ch 2, cut and fasten off. Weave in ends.
Flip your cowl right side out.

And we’re done. 
Yippie yeay!


Yarn: 100% Acrylic
Hook size: 3.5 mm
Stitches used : ch, sl st, sc, hdc, dc, trc

Flower size approximately 2 inch.
Use smaller/larger hook size for a smaller/bigger flower.


You can download the ads-free clean printable PDF version of this pattern here.


Begin: 
Ch 4 (count as first dc)

Round 1: 
9 dc in first ch, sl st in top of ch 4. (Total 10 dc)

Round 2: 
*(Sl st, hdc, dc, trc) in nxt st, (trc, dc, hdc, sl st) in nxt st*. Now you have 1 petal . Repeat * to * 4 times. (Total 5 petals). 

Ch 1, fasten off. 
Weave in ends and you're done. 
Yippie!

You can make this cute mini flower in no time for embellishment, etc. 


You can also follow the easy step-by-step video tutorial below.

Have fun crocheting :)


Newer Posts Older Posts Home

PATTERN SHOP LINK

  • THU
  • ETSY
  • LOVECROCHET

Translate

  • ABOUT

PATTERN SHOP

PATTERN SHOP

Popular Posts

  • Lattice Crop Top
  • Easy & Quick Crochet Tops (3 Styles)
  • Spider Crop Top

Blog Archive

  • ▼  2021 (3)
    • ▼  February (1)
      • Lacy Spring Bandeau
    • ►  January (2)
  • ►  2018 (7)
    • ►  December (1)
    • ►  August (1)
    • ►  June (2)
    • ►  May (1)
    • ►  January (2)
  • ►  2017 (16)
    • ►  November (2)
    • ►  October (1)
    • ►  September (1)
    • ►  August (1)
    • ►  June (1)
    • ►  May (3)
    • ►  April (1)
    • ►  March (6)
  • ►  2016 (3)
    • ►  October (1)
    • ►  August (2)
  • LOVE CROCHET
Credit to any use of my photos and patterns would be appreciated. Copyright of The Happy Unraveler. Powered by Blogger.

Contact

Name

Email *

Message *

Disclosure

This website may contain affiliate links, meaning I may get a small commission if you decide to make a purchase through my links at no cost to you.
This website contain advertisement and affiliate links to keep providing free content. All images are copyright of The Happy Unraveler.

Designed By OddThemes | Distributed By Blogger Templates